New Vintage Audio Restoration HQ

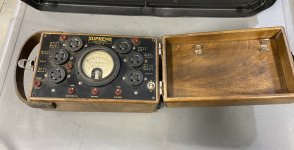
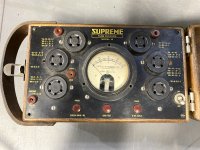
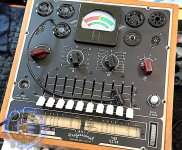
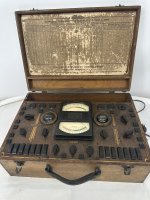
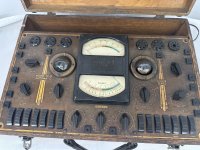
Lookie here what I scored today and is on its way to me - a 1930 Supreme Model 19 tube tester!

What makes this one so cool is how early it is in the evolution of tube testing. Instead of selector switches and roll charts, the tube types are printed right on the faceplate next to their sockets.

Mine still has the original wood case, leather handle, GE/Supreme meter, sockets and panel markings intact.

Now the fun part begins: receiving it and then carefully bringing it back to life!

w1.jpg
w2.jpg
 
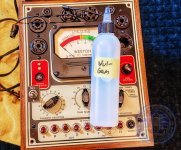
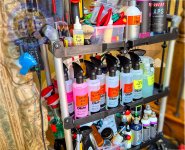
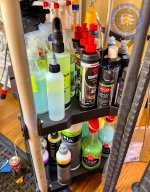
What's in this bottle mixture? About $50 worth of magic sauce.

Often time you'll see grey rings around the tube sockets and trying to clean it is near impossible. It's a different kind of soot than what is on the rest of the tester. Plus it usually extend to the area around the screws that hold the sockets in place.
After much trial and error - I got close to being able to clean that area. However it still fell short as it somewhat cleaned it bur really smeared it more than anything else.

Then I had a thought - no more water based cleaning and instead time to try a very gentle solvent. What do they use at the Louvre? What do they use at the Imperial War Museum and others?

After much research I found out: a mix of Gamsol (special high purity solvent) and Vulpex - a special soap that can be used with water or a solvent carrier.

So I mixed up a batch of 10:1 in favor of Gamsol and tried it today. It worked!
Now I'll clean it one last time with one of my favorite products that doesn't leave any film on the surface and then I'll do some hand polishing to remove some of the scratches.

DIY Audio, Greek audio geek 1.jpg
 
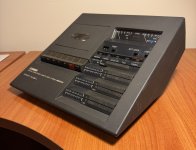
This is my latest project. Yamaha TC-800 GL. Circa 1975. This completes my MOMA (Museum
of Modern Art) audio collection. The other piece is a B&O 4002 Turntable.

Are there any other pieces of HiFi gear in their permanent collection? They have a Dieter Rams designed Braun radio that is awesome, but not really HiFi.

The casework on this one is in decent shape. Some minor wear and scuffs I will need to figure out how to clean up. The surface is textured so I am being super careful.

Any thought or ideas are welcome.

New belts will arrive next week. The disassembly and cleanup begins today.
IMG_0492.jpeg
 
This is my latest project. Yamaha TC-800 GL. Circa 1975. This completes my MOMA (Museum
of Modern Art) audio collection. The other piece is a B&O 4002 Turntable.

Are there any other pieces of HiFi gear in their permanent collection? They have a Dieter Rams designed Braun radio that is awesome, but not really HiFi.

The casework on this one is in decent shape. Some minor wear and scuffs I will need to figure out how to clean up. The surface is textured so I am being super careful.

Any thought or ideas are welcome.

New belts will arrive next week. The disassembly and cleanup begins today.
View attachment 36089
Make sure to clean the record/play switch! Best to do that with spray Deoxit in the green and black can. It leaves a non-volatile lubricant behind which is vital for the switch to work after cleaning.
 
This is my latest project. Yamaha TC-800 GL. Circa 1975. This completes my MOMA (Museum
of Modern Art) audio collection. The other piece is a B&O 4002 Turntable.

Are there any other pieces of HiFi gear in their permanent collection? They have a Dieter Rams designed Braun radio that is awesome, but not really HiFi.

The casework on this one is in decent shape. Some minor wear and scuffs I will need to figure out how to clean up. The surface is textured so I am being super careful.

Any thought or ideas are welcome.

New belts will arrive next week. The disassembly and cleanup begins today.
View attachment 36089

I have dozens of hours of experimenting with cleaning up every kind of metal, plastic, bakelite, glass and more you can think of on over 30 vintage pieces.

I've also studied a bit of the chemistry of what makes different cleaners work on different materials since the vintage stuff is so delicate compared to the newer stuff. Thankfully 70's is considered 'new' so you have more options to choose from.

We need to determine what is the dirt on the unit: smoke? Grease? Human oils? Other?

My guess is looking at it you are dealing mostly with dirts and human oils which is much easier to clean. Also the unit probably never runs hot so that helps keep the dirt from being "baked in" over time.

FIRST - take a soft brush and dust the unit getting off any big dirt particles.

Then ob the side near the bottom take a slightly damp paper towel with only a bit of water. LIGHTLY wipe once or twice and then dry and see what it looks like. If you wipe to hard you will scratch it. Being textured that rules out using any polishes.

If you can sent me a before and after I can help narrow down what cleaners you should use.
 
Make sure to clean the record/play switch! Best to do that with spray Deoxit in the green and black can. It leaves a non-volatile lubricant behind which is vital for the switch to work after cleaning.
Thanks Ralph. I have several types of De-Oxit and will go through all the switches and faders. This deck has all linear faders which are notoriously noisy.
 
I have dozens of hours of experimenting with cleaning up every kind of metal, plastic, bakelite, glass and more you can think of on over 30 vintage pieces.

I've also studied a bit of the chemistry of what makes different cleaners work on different materials since the vintage stuff is so delicate compared to the newer stuff. Thankfully 70's is considered 'new' so you have more options to choose from.

We need to determine what is the dirt on the unit: smoke? Grease? Human oils? Other?

My guess is looking at it you are dealing mostly with dirts and human oils which is much easier to clean. Also the unit probably never runs hot so that helps keep the dirt from being "baked in" over time.

FIRST - take a soft brush and dust the unit getting off any big dirt particles.

Then ob the side near the bottom take a slightly damp paper towel with only a bit of water. LIGHTLY wipe once or twice and then dry and see what it looks like. If you wipe to hard you will scratch it. Being textured that rules out using any polishes.

If you can sent me a before and after I can help narrow down what cleaners you should use.
Thanks Michael,
So far I have used water with a drop of Dawn and microfiber towels to clean the surfaces. I have to take the deck completely apart to change the belts so I’ll be able to fully wet all the surfaces with the casework off. So far it’s mostly just dirt and finger oils and that is coming off nicely. There are some shiny areas on the back. It could be the coating worn off or something on it that doesn’t appear to be water soluble. I think it’s the latter as I can use a fingernail to remove some of it. The good news is that there is a lot of area on the bottom of the deck that will never be visible, so I can experiment with cleaners there.

I have a cammed-out JIS head case screw so I’m working on that right now. Patience, grasshopper. This is fun.
 
Thanks Michael,
So far I have used water with a drop of Dawn and microfiber towels to clean the surfaces. I have to take the deck completely apart to change the belts so I’ll be able to fully wet all the surfaces with the casework off. So far it’s mostly just dirt and finger oils and that is coming off nicely. There are some shiny areas on the back. It could be the coating worn off or something on it that doesn’t appear to be water soluble. I think it’s the latter as I can use a fingernail to remove some of it. The good news is that there is a lot of area on the bottom of the deck that will never be visible, so I can experiment with cleaners there.

I have a cammed-out JIS head case screw so I’m working on that right now. Patience, grasshopper. This is fun.

OK - great info.

And yes - this is the fun part for sure.

I already have an idea what will work great for you but to double confirm - is the casework textured plastic or metal?
 
OK - great info.

And yes - this is the fun part for sure.

I already have an idea what will work great for you but to double confirm - is the casework textured plastic or metal?
The Casework is textured plastic. It’s a medium gray. The texture is moderate and ‘pebble like’ and gives the surfaces a nice hand feel. IDK if it was an in-mold deco or sprayed on after. Hard to say.
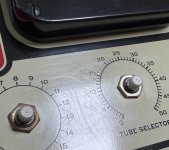
The silkscreened text in the picture is 3mm tall, about 1/8”.

IMG_0496.jpeg
 
OK - good info.

First and foremost - no matter what cleaner you use BE CAUTIOUS AROUND ALL SILK SCREENING.

I would recommend 2 of the following 3 products that of the dozens I've tested are among my top favorite of all:

1) To clean the plastic case and anything plastic: https://www.amazon.com/dp/B004B8EUI0?ref_=ppx_hzsearch_conn_dt_b_fed_asin_title_1&th=1

2) then as a final wipe: https://www.amazon.com/dp/B0002Z2MZ4?ref_=ppx_hzsearch_conn_dt_b_fed_asin_title_2

The Cockpitt Premium is going to make it look matte and factory new. No greasy oils, no fake shine, no slippery spot. Simply like it is factory new. Although it is also a light cleaner, I would use the platstik cleaner first lightly spraying onto a microfiber cloth then onto the plastic.

3) Either as a replacement for the plastic cleaner or in addition: https://www.amazon.com/dp/B00K71AZ5W?ref_=ppx_hzsearch_conn_dt_b_fed_asin_title_1

Honestly the Blitz is fantastic and really surprised me. Benefits over other brands and products:
No residue wipe off
Gentle yet powerful
No film is left behind
I run a bottle at 50:1 and another spray bottle at 30:1 and they work great.
Will not harm your skin
Can be used on any finish

I can't stress enough how strongly this line up should perform for you.

There are products that are stronger, weaker, cheaper and more expensive. But I think these 3 products will let you tackle virtually any finish you may have that isn't 100 years old of baked on grime and be the least problematic on the gear.

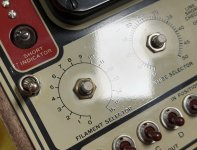
Here is a picture of my 1970 NRI tester after I used these products on the faceplate. I used those three products on every surface (including the power cord) except the wood:

1 copy 1.jpg
 
Last edited:
Michael - that is an amazing restoration. Well done!

Thanks for the great recommendations. I’ll order them today.

These 50 year old decks are moderately scarce and this is the best physical example I’ve found to date.
Most of them are pretty beat up or have deep scratches that I don’t know how to repair.
My goal is to get it as good looking as possible without screwing it up.
I can fix the electronics and the transport looks to be on great shape with no visible wear.
 
Michael - that is an amazing restoration. Well done!

Thanks for the great recommendations. I’ll order them today.

These 50 year old decks are moderately scarce and this is the best physical example I’ve found to date.
Most of them are pretty beat up or have deep scratches that I don’t know how to repair.
My goal is to get it as good looking as possible without screwing it up.
I can fix the electronics and the transport looks to be on great shape with no visible wear.

Happy to help and sound like you're going to have fun fixing it up.

Scratches on plastic - especially textured is near impossible to get looking good again.

Remember - DON'T use anything that is a paste on the textured plastic. You'll be able to get the paste into the little textured crevices, but you almost never be able to get it all out.

The best microfiber cloths I found (and I've tried probably 40 kinds) are the big bag of yellow ones from Costco. They have a plush side and a less plush side.

Use the less plush side to wide on / clean and then a wipe off with another clean one using the plus side.

Feel free to PM me if you need any other help.
 
Thanks again. I’m taking this one slow and being deliberate about what I do. Most everything I see is surface contamination. There maybe one visible scratch that I won’t be able to fix, but even this is only visible at certain angles as the texture is flattened slightly. All in all a good outcome so far. I’ll message you if I have any questions.
Tom
 
Back
Top