- Thread Author
- #1
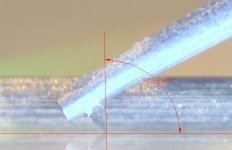
Decided to play around with my crappy USB microscope today and check where my SRA for the Cadenza Bronze was set and I snagged a few pictures to share. I imported the .jpg images into AutoCAD to draw the lines and calculate the angles.
Turns out I am a bit tail down currently.
The most difficult thing I've found with using the USB microscope is to properly line it up perpendicular to the stylus itself when taking the pictures. If you're forward or backward of perpendicular it will skew your effort to draw lines and calculate the SRA properly.
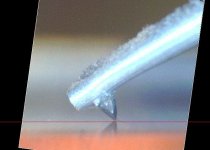
The first picture shown here was one of the cooler looking ones I was able to capture of the Replicant Stylus facets but is not real usable since the camera was "around back" a bit too far (you can see the shadow of the rear facet).

Depending on where the lines were drawn and how the photos were taken (perpendicular wise to the cantilever/stylus) the other twenty-plus photos I captured all ranged from 91.3 to 91.7 degree SRA.

Tonight I adjusted the JMW 10.5 arm up some to what I think is closer to 92 degrees but will need to confirm the adjustment with more pictures tomorrow. So far, bumping the butt-end up a little has added a little more clarity and definition without loss of the bottom end at all.
Please share your pictures of SRA measurements if you have some.
Turns out I am a bit tail down currently.
The most difficult thing I've found with using the USB microscope is to properly line it up perpendicular to the stylus itself when taking the pictures. If you're forward or backward of perpendicular it will skew your effort to draw lines and calculate the SRA properly.
The first picture shown here was one of the cooler looking ones I was able to capture of the Replicant Stylus facets but is not real usable since the camera was "around back" a bit too far (you can see the shadow of the rear facet).
Depending on where the lines were drawn and how the photos were taken (perpendicular wise to the cantilever/stylus) the other twenty-plus photos I captured all ranged from 91.3 to 91.7 degree SRA.
Tonight I adjusted the JMW 10.5 arm up some to what I think is closer to 92 degrees but will need to confirm the adjustment with more pictures tomorrow. So far, bumping the butt-end up a little has added a little more clarity and definition without loss of the bottom end at all.
Please share your pictures of SRA measurements if you have some.