New Vintage Audio Restoration HQ

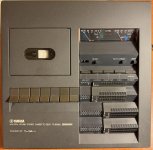
I can fix the electronics and the transport looks to be on great shape with no visible wear.
There will be a lot of electrolytic capacitors to replace! These days anyone working on electronics from the 1970s should expect to replace every one in sight. I do not use tantalum capacitors; if I find them I replace them with good quality electrolytics. Tantalum caps had a way of shorting back in the old days (1970s) and still do.
Showing what using the right polish can do - before and after removing scratches:

View attachment 36107
View attachment 36108
Dang! That looks amazing.
 
Sometimes, before any real restoration work can even begin, you first have to get rid of about 90 years of smell. 😂

One of the latest arrivals has an unbelievably strong old cigar odor — strong enough that I had to bring out the heavy artillery.

Whenever one of these old pieces arrives, I immediately open the shipping box and get all of the packing material and shipping boxes outside. Cardboard, paper, foam, and wrapping material absorb decades of odors and can make the whole room smell before you’ve even touched the equipment.

Usually, an overnight blast from a fan on the unit is enough to make a huge difference.

Not this time.

If you remember, I purposely bought some of these rougher pieces as a test to see just how far we can go restoring really challenging vintage equipment.

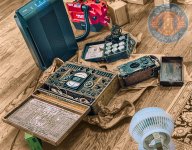
On the smaller unit, I already removed the meter and opened up the faceplate so I could get air circulating through the inside of the tester. That’s often where the worst odors live — all of that old cotton-covered wiring, insulation, dust, and internal material has spent 80–90 years sealed up with almost no airflow.

So this one got the full treatment:

Opened up.
Fan running.
Air purifier parked right next to it.

All before the actual restoration even starts.

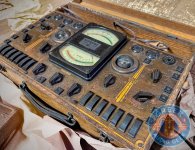
Sometimes restoration is polishing brass and making old wood beautiful again. Sometimes it’s trying to convince a 90-year-old tube tester that it no longer lives in a cigar lounge. 😂
vintage audio.jpg
 
There will be a lot of electrolytic capacitors to replace! These days anyone working on electronics from the 1970s should expect to replace every one in sight. I do not use tantalum capacitors; if I find them I replace them with good quality electrolytics. Tantalum caps had a way of shorting back in the old days (1970s) and still do.

Dang! That looks amazing.
I’ve made some good progress. I’ve cleaned everything up internally and applied De-Oxit D-100 to all the switches (lots of ‘em!) and replaced the belts. The faders got D-100 follows by Faderlube F-100. The rubber was cleaned with rubber cleaner and is in good shape so I don’t think this deck got a lot of use. Really dirty switches got flushed with D-5 or CRC Electronics Cleaner.

Left channel is working, right channel is dead so I’m troubleshooting that. Chances are it’s a switch or a trim pot or a wire that has come loose. The transport is working well and the motor servo is stable, so that’s really good news. The rubber is unobtainium though there are some rebuilders out there.

I haven’t even started to think about electronic component replacement. Since it’s a single rail design this thing is chock full of aluminum electrolytics. I want to get it fully functional first and see how it performs. Then I’ll see about replacing caps. It is, after all a cassette deck with all the limitations that come with that format.

Those Tantalum’s are pesky time bombs. I’ve seen the aftermath of a PWB that burned up as a result of a tantalum cap fire. They sure had low ESR over a wide of frequencies though, so they got used in a lot of power supplies.

The cleaner/restorer that Michael recommended arrived today so more case cleanup is next in line.
 
I’ve made some good progress. I’ve cleaned everything up internally and applied De-Oxit D-100 to all the switches (lots of ‘em!) and replaced the belts. The faders got D-100 follows by Faderlube F-100. The rubber was cleaned with rubber cleaner and is in good shape so I don’t think this deck got a lot of use. Really dirty switches got flushed with D-5 or CRC Electronics Cleaner.

Left channel is working, right channel is dead so I’m troubleshooting that. Chances are it’s a switch or a trim pot or a wire that has come loose. The transport is working well and the motor servo is stable, so that’s really good news. The rubber is unobtainium though there are some rebuilders out there.

I haven’t even started to think about electronic component replacement. Since it’s a single rail design this thing is chock full of aluminum electrolytics. I want to get it fully functional first and see how it performs. Then I’ll see about replacing caps. It is, after all a cassette deck with all the limitations that come with that format.

Those Tantalum’s are pesky time bombs. I’ve seen the aftermath of a PWB that burned up as a result of a tantalum cap fire. They sure had low ESR over a wide of frequencies though, so they got used in a lot of power supplies.

The cleaner/restorer that Michael recommended arrived today so more case cleanup is next in line.

Good luck and keep us updated!
 
This is going to be a NEW kinda challenge.....the face plate is brass.

That basically takes almost ALL the cleaning and restoration options off the table.

I can't wait to tackle it!


Tube Tester, Greek Audio Geek.jpg
 
I’ve made some good progress. I’ve cleaned everything up internally and applied De-Oxit D-100 to all the switches (lots of ‘em!) and replaced the belts. The faders got D-100 follows by Faderlube F-100. The rubber was cleaned with rubber cleaner and is in good shape so I don’t think this deck got a lot of use. Really dirty switches got flushed with D-5 or CRC Electronics Cleaner.

Left channel is working, right channel is dead so I’m troubleshooting that.
The most common problem that takes out one channel is a wire breaking off of the tape head. If the rubber seems good, its a good bet it will not be that way long if pressed into service. Most cassette machines are so old you have to replace every rubber part in sight.
 
I’ve made some good progress. I’ve cleaned everything up internally and applied De-Oxit D-100 to all the switches (lots of ‘em!) and replaced the belts. The faders got D-100 follows by Faderlube F-100. The rubber was cleaned with rubber cleaner and is in good shape so I don’t think this deck got a lot of use. Really dirty switches got flushed with D-5 or CRC Electronics Cleaner.

Left channel is working, right channel is dead so I’m troubleshooting that. Chances are it’s a switch or a trim pot or a wire that has come loose. The transport is working well and the motor servo is stable, so that’s really good news. The rubber is unobtainium though there are some rebuilders out there.

I haven’t even started to think about electronic component replacement. Since it’s a single rail design this thing is chock full of aluminum electrolytics. I want to get it fully functional first and see how it performs. Then I’ll see about replacing caps. It is, after all a cassette deck with all the limitations that come with that format.

Those Tantalum’s are pesky time bombs. I’ve seen the aftermath of a PWB that burned up as a result of a tantalum cap fire. They sure had low ESR over a wide of frequencies though, so they got used in a lot of power supplies.

The cleaner/restorer that Michael recommended arrived today so more case cleanup is next in line.

Hey! How are things progressing on this?
 
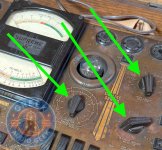
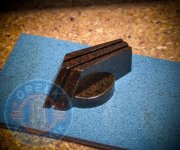
After 73 - yes 73 experiments I FINALLY found a way to restore these 90 year old knobs.

I've tried different kinds of polishes, grits of polishes, brands of polishes, wax/polishes. sealant/polishes, waxes, sealant, oils, sandpaper up to 12,000 grit, different types of pads and cloths, basically everything but a one handed stand.

FINALLY figured it out on #74!!!!

Knobs.jpg


Knob 2.jpg
 
I’m almost done with the cosmetic cleanup. A bit more detailing around the sliders, a bit more to tidy up but the old bird is looking pretty good.

There are only a few small actual plastic scratches and they are not very deep or noticeable. Most you can only see when the light is at an oblique angle. For something plastic and over 50 years old that’s a minor miracle. I’m very pleased with the condition of the casework. It’s good enough for me to complete the restoration.

I cleaned the transport and all the rubber components. The rubber looks good and the transport works properly, including g the motor and servo circuitry.

I still have a lot of electrical troubleshooting and alignment to do. I cleaned all the switches and pots and I have both channels playing, but the playback gain is low. As Ralph mentioned there are lot of electrolytic caps that are questionable due to age.

We are at our summer place and I don’t have any test equipment here. So I put the deck together and am listening to some old mix tapes for the fun of it.

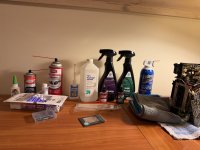
Here is a pic of all the goods I used to clean up this deck. Not shown is the M3-0.5 tap I used to clean up one of the brass inserts that had been abused.

There was a lot of schmutz of uncertain origin that the Isopropyl alcohol dissolved. After that I tried the two Nextzett products. Cockpit Premium is the bomb. Nectar of the gods for plastic.

Switches got flushed out with CRC cleaner, then D-50, then D100. Faders and pots got D100 then F 100 Faderlube.

I went through several hundred cotton swabs and dozens of cotton balls

IMG_0518.jpegIMG_0530.jpeg
The end result looks pretty good.
 
After 73 - yes 73 experiments I FINALLY found a way to restore these 90 year old knobs.

I've tried different kinds of polishes, grits of polishes, brands of polishes, wax/polishes. sealant/polishes, waxes, sealant, oils, sandpaper up to 12,000 grit, different types of pads and cloths, basically everything but a one handed stand.

FINALLY figured it out on #74!!!!

View attachment 36125


View attachment 36126
Those are beautiful! Are they Bakelite?
 
After 73 - yes 73 experiments I FINALLY found a way to restore these 90 year old knobs.

I've tried different kinds of polishes, grits of polishes, brands of polishes, wax/polishes. sealant/polishes, waxes, sealant, oils, sandpaper up to 12,000 grit, different types of pads and cloths, basically everything but a one handed stand.

FINALLY figured it out on #74!!!!

View attachment 36125


View attachment 36126
I’m impressed, Michael. I’m pretty sure that I have never seen a more stark example of before and after restoration. Well done.. (y)
 
I’m almost done with the cosmetic cleanup. A bit more detailing around the sliders, a bit more to tidy up but the old bird is looking pretty good.

There are only a few small actual plastic scratches and they are not very deep or noticeable. Most you can only see when the light is at an oblique angle. For something plastic and over 50 years old that’s a minor miracle. I’m very pleased with the condition of the casework. It’s good enough for me to complete the restoration.

I cleaned the transport and all the rubber components. The rubber looks good and the transport works properly, including g the motor and servo circuitry.

I still have a lot of electrical troubleshooting and alignment to do. I cleaned all the switches and pots and I have both channels playing, but the playback gain is low. As Ralph mentioned there are lot of electrolytic caps that are questionable due to age.

We are at our summer place and I don’t have any test equipment here. So I put the deck together and am listening to some old mix tapes for the fun of it.

Here is a pic of all the goods I used to clean up this deck. Not shown is the M3-0.5 tap I used to clean up one of the brass inserts that had been abused.

There was a lot of schmutz of uncertain origin that the Isopropyl alcohol dissolved. After that I tried the two Nextzett products. Cockpit Premium is the bomb. Nectar of the gods for plastic.

Switches got flushed out with CRC cleaner, then D-50, then D100. Faders and pots got D100 then F 100 Faderlube.

I went through several hundred cotton swabs and dozens of cotton balls


The end result looks pretty good.

Looking good!

I'm SOO glad the products I suggested are working well for you. I really do think they are fantastic products.
 
Looking good!

I'm SOO glad the products I suggested are working well for you. I really do think they are fantastic products.
The Nextzett products will also find good use on my Porsche 911. German products for German cars! The low to no shine is really impressive.

There is a challenge finding the correct cleaners and it’s fun when they work. In this case Isopropyl alcohol did the trick cleaning up some adhesive from old tape and some unknown schmutz. The Nextzett products got all the fingerprints and restored depth to the plastic.

I’m going through the schematic and parts list for an upcoming order to Mouser or DigiKey. Lots of caps to replace.
 
The Nextzett products will also find good use on my Porsche 911. German products for German cars! The low to no shine is really impressive.

There is a challenge finding the correct cleaners and it’s fun when they work. In this case Isopropyl alcohol did the trick cleaning up some adhesive from old tape and some unknown schmutz. The Nextzett products got all the fingerprints and restored depth to the plastic.

I’m going through the schematic and parts list for an upcoming order to Mouser or DigiKey. Lots of caps to replace.
I'm so glad you're enjoying them.

I actually have tried about 45 products and found 3 or so GREAT ones.

I love the challenge, the journey, the exploitation. Most are 'meh' products but the excitement when you find one of the great ones is so much fun.

I will say I've been using Nexzett for 30 years, and I'm currently LOVING one of their newer products called Blitz.

I have it at a couple of dilution ratio's and it cleans well and leave so left over film.
 
Back
Top