New Vintage Audio Restoration HQ

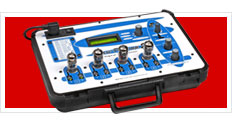
I wonder if this tester is good enough to check the health of the tubes it is capable of testing?

For basic testing is sure it. It looks to be a basic go/no go tester meaning it will tell you simply tell you (generally) if the tube is OK to use or not.

It's great for the person who simply wants to be a responsible tube owner but not get into the nitty-gritty of testers and such.

I know for a while Orange was having some issues with their testers not breaking, I don't know if that has been resolved.
 
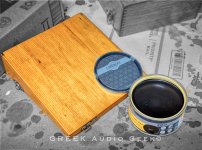
Using a black patina wax to apply against the grain and then wipe off to help highlight the grain pattern and imperfections in the wood adding an 'aged' look to the piece.

You apply the black wax against the grain to really work it in. Then again wiping agains the grain wipe over clear wax that will remove the black that is on the surface but leave the black in the grain alone to help highlight the effect.

Patina.jpg
 
For basic testing is sure it. It looks to be a basic go/no go tester meaning it will tell you simply tell you (generally) if the tube is OK to use or not.

It's great for the person who simply wants to be a responsible tube owner but not get into the nitty-gritty of testers and such.

I know for a while Orange was having some issues with their testers not breaking, I don't know if that has been resolved.
I think the MKII version cleared up their issues.
I don’t have the knowledge or expertise to restore and calibrate a vintage tester. I did find this company but would require two testers, one for preamp tubes and one for power tubes.

 
I think the MKII version cleared up their issues.
I don’t have the knowledge or expertise to restore and calibrate a vintage tester. I did find this company but would require two testers, one for preamp tubes and one for power tubes.

I've heard very good things about the Maxi's. You should be good to go with them.

I totally agree that owning a vintage tester is a commitment for sure. It's not for the faint of heart.
 
WOOO HOOOO!!!!

If you recall the new (1947) Weston tester I received was acting funky. I was a bit perplexed.

So I Facetimed my West-Coast-tube-tester-buddy (he's a retired Navy Engineer who used to use these testers on the ships) walked me through some steps and we got it working fantastic!

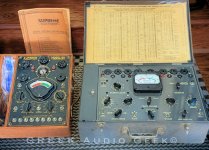
Now it's time to undertake the cosmetic refinishing and later this week tackle opening up the 1936 Supreme tester on the left of this photo to check out the insides of that one.

1 8 forum white.jpg
 
I just produced and will be posting soon a short video on refinishing the case on the Weston and how this one was a bit more challenging than others for two reasons:

1) the case is a textured finish so a traditional polishing would embed the wax in the valleys of the textured paint and be impossible to get out:
2) the finish on the faceplate was a different king of paint than I have seen on others so it would continually either smear the polish when trying to remove it or simply created additional hazing in the pain that then needed to be removed by abrasive methods.

Here is a picture of the finished product taking its place on Tube Tester Row right next to my TV-7 tester.

Currently on tap to be looked at electrically are:

1935 Supreme Type 35 tester;
1936 Supreme Ype 89S tester;
NRI model 67;
Readrite 430 (which is a Tripplite).

Weston.jpg
 
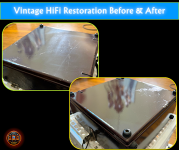
A great example of the before and after shot of this vintage audio restoration.

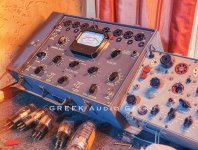
I chose NOT to repaint or REPAIR the factory 1940's color on this NRI Type 67 tube tester, but instead to clean, polish and embrace it with all its character flaws.

The before photo is actually AFTER I did a first pass with a heavy compound to get some of the grime off.

The AFTER is actually several steps later.

I tried my normal go-to medium polish and although it looked better, I didn't feel it was to my standards.

So I then did it 2 more times but this time using Scholl's S20 polish.

All times were done with my Flex rotary polisher at a slow 500 RPM's.

Why so slow? Any faster and you run the risk of scarring the paint with swirls. By going low and slow it will do no harm to the paint.

Note the silver splotches in the photos are where the paint is missing but do to wanting to keep it natural I'm not going to repaint it.

Vintage HiFi Restoration Before & After.png
 
I've really enjoyed trying different finishes and techniques and learning how to influence the final finish.

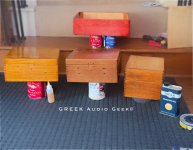
Here are some recent ones I've completed.

#1) I’ve been trying to teach myself French Polishing. This one had a base layer of General Finishes Seal a Cell followed up with 15 layers of my hand rubbing on the shellac finish in the true French Polish technique. It is topped with a layer of Liberon Black Bison Wax applied with special steel wool and wiped of with Grade 50 cheese cloth. The Cheesecloth keeps the wax from overheating and smearing during the wipe off process that is common when using a regular cloth.

2) This case was terribly cheap looking with very light wood that looked plasticky. I applied some Watco Danish oil and it did not look very good. I removed it and applied MinWax Poly Shades and it looked “eh.. I stripped it again and applied General Finishes red dye stain topped with three layers of their satin oil gel topcoat as pictured.

3) Finished with three layers of Osmo PolyX.

4) Applied three thin layers of Liberon Finishing Oil topped with 4 coats of my special home made wax which is a mixture of Liberon Wax, turpentine and Liberon Finishing Oil.

w11.jpeg
 
Back
Top