My DIY speakers -"J&N"

jororaitchev

New member
Joined
Sep 10, 2021
Messages
43
Location
Sofia- Bulgaria
The idea of hand-made/ DIY / loudspeakers was born in me, when I saw the model of JBL-tI6K . The design and fabrication of these unique shapes are made by a Danish designer. The pyramidal shape of the speakers is generally denied by the DIYers, or at least for the most part, but I decided at the moment that's my loudspeaker design..
If there is interest in the topic, I will continue.
123176897_1247199218986170_8724148118845807114_n.jpg
 
Very nice! Can you give us details on the drivers, crossovers and cabinet volume/design? How efficient are they and what kind of load are they?
 
Very nice! Can you give us details on the drivers, crossovers and cabinet volume/design? How efficient are they and what kind of load are they?
I started working with them in 2009 and finished in 2012.
The loudspeakers are "SEAS"- Excel / Tw-1”, Mw-5”for center 2х 5.5”,Bass-8,5”/ and cross-over parts- "Intertechnik".

Nominal impedance- 8 Ohm. Range 30Hz-25kHz.Characterstic Sensitivity(2,83V/1m)- 87db.
Long Term-110W.

I'll show you, how was made the speakers are made, step by step.
Joro

P.S.
For those who are most impatient on Facebook; Jorors DIY-Audio, it is not a link, but a closed group.
Anyone who wants to become a member is welcome, but you have to make a request to me!
 
When everything is created by your hands, the pleasure is endless!
I wish everyone DIYer, to be able to experience such emotional moments!
93290838_1089927621379998_1093854911034032128_n.jpg
 
Very nice! Can you give us details on the drivers, crossovers and cabinet volume/design? How efficient are they and what kind of load are they?

Thanks!
I'll show you, how I made these speakers, supported with photos and with detailed information as possible. This project is a long time ago and some of the stages during their construction , I can not show them - I do not have the necessary material, but what is available, I suppose will be enough to provoke your interest.
At first, I had to figure out how to bend MDF plates. In the internet now has a very detailed material on how this process is being carried out with complicated multi-operative press mashine, but 2009 this information was scarce and irrelevant to me because, its clear I can not make a similar device at home.
For this purpose, I made this "Home Matrix" for the center and front speakers;
36628372_625488834490548_7576668252579823616_n.jpg

36585003_625484504490981_3600345649716920320_n.jpg
36726620_626227971083301_3188676199786217472_n.jpg
36616234_625506941155404_6571884413439705088_n.jpg
 
I have no opportunity to publish photos from my computer. The administrator told me that I can, but I can't, but the administrator told me that I can, but I can't ........
P.S.
I have registered in over 15 DIY Loudspeakers Forums worldwide and in these forums I have many published photos from my computer, why in this forum things do not work?
 
My initial idea was, for a bass speaker 6.5 ", but once I assembled the pilot model and measured the internal volume of the cabinet, found that I had enough reserve even for a 10" speaker. I decided at this stage to use 8.5 ".
This is the first option;
 

Attachments

  • Var-1.jpg
    Var-1.jpg
    67.4 KB · Views: 246
  • Var.2.jpg
    Var.2.jpg
    57.5 KB · Views: 245
  • Var.-3.jpg
    Var.-3.jpg
    57.7 KB · Views: 241
The final decision;
"SEAS" - Excel / Tw-1 ", Mw-5" for center 2x 5.5 ", Bass-8.5" / and cross-over parts- Intertechnik. Nominal impedance- 8 Ohm. Frequency Range 30Hz-20kHz.Characterstic Sensitivity (2.83V / 1m) - 87db Long Term-110W.
 

Attachments

  • z2 (2).jpg
    z2 (2).jpg
    60.7 KB · Views: 246
  • z2 (1).jpg
    z2 (1).jpg
    62.5 KB · Views: 241
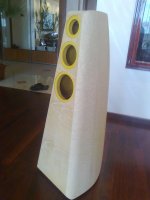
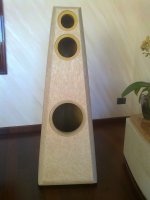
The veneer I use in Bulgaria is known as "Birds of Maple", in the world is also known as "Bird's eye" . We reach the moment of very specific activity - veneering with natural veneer. When veneering panels, details is in one plane, there are no problems. There is only a requirement - the person who collects the individual pieces has good skills, the rest is completed by the pneumatic press.
When we talk about a complex shape, our immediate association is for "Vacuum press", but there is a limit to the thickness / height / of the workpiece. If we are talking about veneering of a flat surface with motifs on the surface - it does work, but if it is another massive form- don’t.
Due to the complexity of the process, i will pay close attention to it. My technique is complex, risky on a large scale and I definitely do not recommend it to enthusiasts with little experience! A natural veneer can bend tangentially or radially, usually masters prefer to work in just one direction - for less headaches. In my method of processing, I use both bending directions simultaneously, but add a third diagonal bending.
The other main problem is the adhesive with which it sticks the veneer, it is polychloroprene, this glue does not allow you to move the veneer, once touched to the base there is no other chance-stays there. If you try to move it, you will break the veneer at the moment, and when we talk about "Birds of Maple" with a price over 60 EUR, the feeling it's not pleasant!
I will explain my technique for cutting veneer before gluing it.
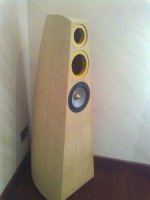
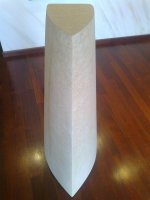
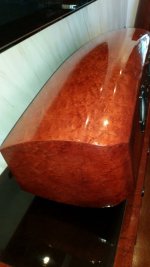
On the finished cabinet of the loudspeaker, from " India paper" / she is the closest with the veneer / I make the templates that should lie perfectly on the base. The problem is in the wrong shape, the veneer after gluing in one part, changes his shape, although everything has previously been matched perfectly. It requires a lot of attention, patience, and proper judgment, which part should squeeze, otherwise balloon spaces are created, which are very difficult to correct without being visible later. Sometimes, depending on the type of veneer, moistening helps, but this action also requires judgment with experience.
 

Attachments

  • 36749427_627349120971186_3691448301271384064_n.jpg
    36749427_627349120971186_3691448301271384064_n.jpg
    45.1 KB · Views: 221
After veneering the next steps are, to make the desired color , and the following finish manipulation , spraying with high quality automobile acrylic lacquer. To obtain the desired gloss, after about the tenth layer, the surface after each new one subsequent layer (total about 20-25) is polished, the result is this end product;
 

Attachments

  • 1.jpg
    1.jpg
    87.6 KB · Views: 225
  • 2.jpg
    2.jpg
    96.7 KB · Views: 222
  • 5.jpg
    5.jpg
    81.9 KB · Views: 228
  • 3.jpg
    3.jpg
    89 KB · Views: 228
  • 4.jpg
    4.jpg
    77.3 KB · Views: 227
Back
Top