I guess it is a hobby now.

brad225

Well-known member
Joined
Apr 11, 2017
Messages
1,037
Location
Wesley Chapel, FL
Since I retired 8 years ago I guess my woodworking profession is officially a hobby now.

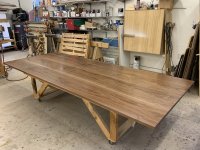
My current project I started this week is a dining room table. When we sold our last home in 2005 the dining room furniture ended up going with the house as part of the price negotiation.
We purchased a basic table for the dining room in the new house but it's not my taste nor is it big enough for my wife's substantial family.

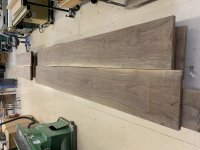
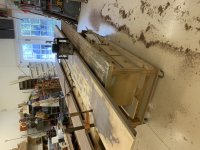
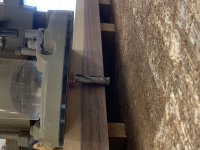
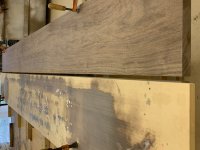
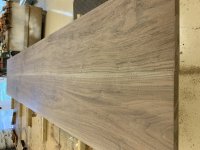
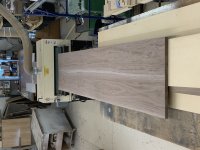
We finally decided on Walnut with a clear finish on the table. One of the first things that has taken a few months is locating the lumber. I wanted boards as wide as possible but also with similar grain with all of the boards hopefully, coming from the same tree. That turned out to be as big a challenge as I suspected. I finally found Irion Lumber in Wellsboro, Pa that sells matched flitches of boards. I chose 2 different groups and it showed up in Florida 6 days after ordering.

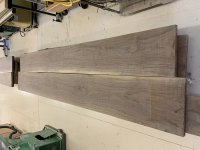
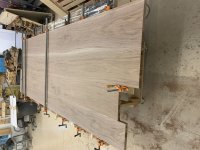
This is the 2 groupings. They are both 1 1/4", one being 11'-12' and the other 7'-8'.
 

Attachments

  • aDT5uqVCSIua7FSKVmyngw.jpg
    aDT5uqVCSIua7FSKVmyngw.jpg
    1.8 MB · Views: 314
  • 1CQjKayvQHG9OnbPR9kMjA.jpg
    1CQjKayvQHG9OnbPR9kMjA.jpg
    1.7 MB · Views: 310
The first thing was to pick our which combination of the 6 long boards would create the 48" wide top I needed to end up with. Once I laid them out I picked a combination with the best grain match that would give me width need.
I roughly straightened them on the table saw and tried different combinations for the layout. This is where I ended up before jointing the edges to make them straight for gluing.
 

Attachments

  • EsHBhEw%RCeZTtE2BtfkVw.jpg
    EsHBhEw%RCeZTtE2BtfkVw.jpg
    2.4 MB · Views: 303
  • ctX79JcLTz27cpOxkYzzkQ.jpg
    ctX79JcLTz27cpOxkYzzkQ.jpg
    2.1 MB · Views: 305
Wow, it’s looking awesome. Can’t wait to see it finished. I give you a lot of credit working with your hands like that. Well done!
 
The next process took necessary direction I had never thought about before.
The edge along the length of each board needs to be jointed straight so it will have a tight fit to the board beside it for gluing together. Because these boards averaged 11' long and 13"-16" wide and 60+ pounds each the typical approach of standing them on edge and sliding them across a cutter head that would straighten them was not practical.

After toying with purchasing a piece of aluminum that would be long enough and straight enough then going to purchasing 2 circular saw guides that were 5'-6" long and attach them together for the length i needed. I ordered the 2 guides still not convinced it was the right way to go figuring I would just return them if I went another direction.

I did come up with a better idea but unfortunately it was at 4AM laying in bed. That was the end of sleep for that day.

My decision was to glue 2 pieces of 3/4" thick MDF medium density fiberboard together to make an 11' long board. I figured I should be able to get a very straight edge be sending it through the table a few times recutting the opposite edge each time. My only concern was if it wasn't perfectly straight, when I used it as a guide for cutting the edge with a router I would have 2 edges that would not be able to be champed tight.

With that guid made I clamped it to the first walnut board and with a guide bushing in the router base I used a solid carbide spiral cutting bit to make the edge of the board match guide just 1/8" out from the MDF pattern.
 

Attachments

  • RuUs3LaFQzOd2Z%%caHOsg.jpg
    RuUs3LaFQzOd2Z%%caHOsg.jpg
    2.6 MB · Views: 299
  • pXn3laeISlig7EOELIPU1g.jpg
    pXn3laeISlig7EOELIPU1g.jpg
    1.8 MB · Views: 295
  • OUgSVx+eRLOIOGtWYBcO2w.jpg
    OUgSVx+eRLOIOGtWYBcO2w.jpg
    1.8 MB · Views: 302
After making the first cut. The idea came to me how to make the next board fit perfectly when routed.
First I left the guide clamped to the original board original board. I clamped the board and the MDF guide to the bench under them. I then slid the next walnut board that needed the same cut on it up to the first board and spaced them apart by 7/16". The cutter I was using in the router was 1/2" diameter so in theory if I ran the router down the MDF guide a second time it would make the same exact cut on the second walnut board. ( I hope that makes some sense.)

It turns out it made a perfect cut that was exactly parallel with the first. When I pushed the 2 boards together I was stunned as I had never gotten that perfect a joint with any piece of equipment.

These pics show the 2 boards in their spaced and clamped position after routing and then the boards just pushed together with virtually no sign of a joint except for the difference in grain pattern.

I will continue this tomorrow.
 

Attachments

  • BBGac0bxQfKrXcz73QSwsQ.jpg
    BBGac0bxQfKrXcz73QSwsQ.jpg
    1.9 MB · Views: 290
  • NjXJXeW2QkWJG5cirS0dQw.jpg
    NjXJXeW2QkWJG5cirS0dQw.jpg
    2.7 MB · Views: 296
Really nicely done. They look great together.


Sent from my iPad using Tapatalk
 
oh my... i would love to have woodworking skills like you. such a fascinating project and methods.

thanks so much for posting this -- i am really looking forward to seeing the project progress!!
 
With the 4 boards straightened I then glued together 2 boards to end up with 2 large pieces 25" x 132". I needed to keep them that width as my sanding machine will only take a 36" wide piece of wood.

The pic shows one of the wide boards feeding into the sander. The boards were resting on temporary tables I set up for in feed and out feed through the sander. They were sanded with 80 grit and 120 grit before being glued into a 50" wide single piece.
 

Attachments

  • +7kxWjDQSTafqg6%Es8dxQ.jpg
    +7kxWjDQSTafqg6%Es8dxQ.jpg
    1.7 MB · Views: 252
Once both of the boards were sanded I straightened the edges to be glued together using the router and straight edge as before. Once glued together it created the final width of the top.
 

Attachments

  • z9pth+u0Rx6ixJTCn6RI5A.jpg
    z9pth+u0Rx6ixJTCn6RI5A.jpg
    2 MB · Views: 258
I cut the top to length with the circular saw and guide then cut the width using the same method. After cutting I used the router and guide to leave a smooth clean cut on the sides and ends.
 

Attachments

  • QmCSeiqBRh2eGRkoujIEJg.jpg
    QmCSeiqBRh2eGRkoujIEJg.jpg
    2.4 MB · Views: 227
I then had the finished 48" x 120" table top.

Unfortunately that meant it was time to start the never enjoyable but necessary job of sanding the top to make it ready for finish. Starting with 80 grit on a
Dual-Action sander to be sure the center joint was flat with the 2 halves. Then onto 100, 120 and 150.
 

Attachments

  • qulwUT37Qxu534EbNzXYgQ.jpg
    qulwUT37Qxu534EbNzXYgQ.jpg
    2.2 MB · Views: 258
After cleaning the shop I was able to spray the first 3 coats of post catalyzed lacquer. That just means that I add the harder just before it goes in the spray gun. Using the post catalyzed means it has a chemical hardening process rather than having the solvents evaporate out to harden. This way I could spray the sealer coats in a matter of a couple of hours rather than days. The catalyzed lacquer will resist damage from most anything it would encounter including mild acid should that somehow happen.

I let that dry 24 hours and with some help flipped the top over and sprayed the bottom to seal it.

This pic shows it this morning before I sanded the topside and sprayed hopefully the final coat on the top. If so I will move the top out of the shop into a storage room while I start working on the base of the table.
 

Attachments

  • T30yXulmR8yBuHT7BYa0cg.jpg
    T30yXulmR8yBuHT7BYa0cg.jpg
    2.2 MB · Views: 254
Incredible project. Love the walnut. Well done. I’m not quite as handy, so I had to buy my walnut table! Can’t wait to see what the legs look like.

45FA9BF6-C89A-474C-B920-94FC122F76C0.jpeg
 
Beautiful! You’re all in. Awesome workmanship. Wow.


Sent from my iPhone using Tapatalk Pro
 
Incredible project. Love the walnut. Well done. I’m not quite as handy, so I had to buy my walnut table! Can’t wait to see what the legs look like.

View attachment 29382


Nice table. Walnut not only looks beautiful it smells great when working with it.

I smoke a lot of trout and salmon and was thinking the sweet smell of Walnut would be great for that. I looked up smoking with walnut and found it is very acidic and should only be used on strong meats like wild hog and bear. Oh well I still might try a small piece of fish I'll pass on the wild meat.
 
Nice job Brad. You have a wonderful shop!

How do you plan to do the legs?

Got to love Walnut.

It's always a work in progress for me designing furniture.

Currently it will have 2 pedestals with 3 structural members, 2 that curve toward the sides of the top and 1 that will curve toward the middle of the table. The Idea is to give a as much as possible out of the way of legs and feet.

Each of the curved members will be made of 5 pieces of wood. I started roughing out the main pieces today.
Cutting up these boards leaves smaller pieces that need be used for something small.

What a coincidence, because as of now, I am also building a table and 2 chairs for our 18 month old grand nephew and his sister to be born in April. I think this one is going to be much more fun to create. I'll work on both at the same time but a tiny chair but a tiny child's chair is much cooler.
 
Started the tiny childs chair on Sunday morning. They are much more fun than the dining room table. I will start the table to go with the chairs once he sits in one to get a max height for the table he can use now.
 

Attachments

  • ALObQfdVRza9KsrNq9SmVQ.jpg
    ALObQfdVRza9KsrNq9SmVQ.jpg
    1.4 MB · Views: 184
  • IJT%XxgWRnOysgobCraPQQ.jpg
    IJT%XxgWRnOysgobCraPQQ.jpg
    1.4 MB · Views: 181
Back
Top